In result of Google’s latest updates to its Maps API services (June 11, 2018), a lot of people are unhappy with these shocking changes.
- Increase in the price.
- Decrease in the free map loads.
- Obligation of adding a billing account.
- Etc…
Therefore, a lot of those people are looking to replace their use of Google Maps to something as good (or at least remotely as good).
Today, I’ll talk about OpenStreetMap, a possible alternative to Google Maps. Why is it good and how to use it using the Leaflet javascript library.
The code used in this post is available here and the demo page is here.
Changes to Google Maps
Here are some of the changes Google did:
- Standard and Premium plans have been merged into a pay-as-you-go plan.
- Google raised its price by more than 1400%!
- All projects now need valid API keys, there is no more keyless access.
- In order to be able to use the Maps API, you’ll have to add a billing account (even for “free” use).
- Every month, you’ll get 200$ of free usage. This is equal to 28,000 requests per MONTH (while before, it was 25,000 requests per DAY).
- The support is now free for both usages.
- Upon exceeding the 200$, your account will be charged 7$ per 1000 requests (yes, 7 dollars).
OpenStreetMap
Before starting the integration part, let’s talk about OSM.
What is it
OpenStreetMap is a collaborative project to create a free editable map of the world. Rather than the map itself, the data generated by the project is considered its primary output.
It is built by a community of mappers that contribute and maintain data about roads, trails, cafés, railway stations, and much more, all over the world.
Why is it good
- Local Knowledge: OpenStreetMap emphasizes local knowledge. Contributors use aerial imagery, GPS devices, and low-tech field maps to verify that OSM is accurate and up to date.
- Community Driven: OpenStreetMap’s community is diverse, passionate, and growing every day. Our contributors include enthusiast mappers, GIS professionals, engineers running the OSM servers, humanitarians mapping disaster-affected areas, and many more.
- Open Data: OpenStreetMap is open data: you are free to use it for any purpose as long as you credit OpenStreetMap and its contributors. If you alter or build upon the data in certain ways, you may distribute the result only under the same license.
What makes it great is that it’s open source, free to use and highly customizable. Actual people helped making it thanks to their contributions and even you can help in the process!
Integrating OpenStreetMap to your website using Leaflet
In this part, we’re going to look at how to:
- Add a map to your website.
- Add markers to our map.
- Handle click events on the map/markers.

Final result
Requirements
- A basic knowledge of HTML, CSS and Javascript (nothing fancy).
- The leaflet library (download here).
My project’s structure is as follow:
- leaflet
- library’s files
- index.html
- main.js
Adding the map
At first, your index page should look like:
<!DOCTYPE html>

<html lang="en" xmlns="http://www.w3.org/1999/xhtml">
<head>
    <meta charset="utf-8" />
    <title>OpenStreetMap, Google Maps alternative using Leaflet</title>
</head>
<body>

</body>
</html>
We’ll then go ahead and import leaflet and our javascript file:
...
    <link rel="stylesheet" href="leaflet/leaflet.css" />
...

    <script src="leaflet/leaflet.js"></script>
    <script src="main.js"></script>
...
We’ll then add a div element that will contain the map. This element has to have a height in order for the map to show and an Id.
In my case, I went ahead and added a title and centered everything on the page.
<!DOCTYPE html>

<html lang="en" xmlns="http://www.w3.org/1999/xhtml">
<head>
    <meta charset="utf-8" />
    <title>OpenStreetMap, Google Maps alternative using Leaflet</title>
    <link rel="stylesheet" href="leaflet/leaflet.css" />
    <style>
        html, body {
            text-align: center;
        }
        #map {
            height: 500px;
            width: 700px;
            max-width: 100%;
            margin: auto;
        }
    </style>
</head>
<body>

    <h1>OpenStreetMap, Google Maps alternative using Leaflet</h1>
    <div id="map"></div>

    <script src="leaflet/leaflet.js"></script>
    <script src="main.js"></script>

</body>
</html>
Now to the Javascript part!
To keep everything clean and simple, I created a function that will handle the map creation:
function createMap(elemId, centerLat, centerLng, zoom) {
    var map = new L.Map(elemId);

    // Data provider
    var osmUrl = 'https://{s}.tile.openstreetmap.org/{z}/{x}/{y}.png';
    var osmAttrib = 'Map data © <a href="https://openstreetmap.org">OpenStreetMap</a> contributors';

    // Layer
    var osmLayer = new L.TileLayer(osmUrl, {
        minZoom: 4,
        maxZoom: 20,
        attribution: osmAttrib
    });

    // Map
    map.setView(new L.LatLng(centerLat, centerLng), zoom);
    map.addLayer(osmLayer);
    return map;
}
Here’s what this code does:
- Creates a Map instance using the element id specified.
- Creates a TileLayer that uses OSM’s url as a provider (we also add the custom attribution for copyright).
- Sets the view of the map (center location and zoom).
- Adds our OSM layer to the map and return it.
Now all we have to do is use this function to initialize our map!
document.addEventListener("DOMContentLoaded", function () {
    // The DOMContentLoaded event fires when the page is ready (like $(document).ready() in jQuery)
    var map = createMap('map', -21.208312, 46.262851, 6);
    // map is the id of our div element and the other options are
    // lattitude, longitude and zoom
});
If you launch your index.html file in the browser, you should be able to see the map.
Adding markers
First, we’ll store some positions (latLng) for our markers:
markersLatLng = [
    [-18.586379, 45.878906],
    [-22.311967, 47.373047],
    [-20.61479, 45.922852]
];
Again, I created a function to handle creating markers to keep things clean:
function addMarker(map, latLng, onClick) {
    var marker = L.marker(latLng).addTo(map);
    if (onClick !== null) {
        marker.on('click', onClick);
    }
    return marker;
}
The code is pretty straightforward, it creates a marker instance using a latLng and adds it to the map.
I’ll talk about the onClick parameter in the next part.
Now all we have to do is loop on our markers positions and use this function to add them after we create our map.
var map = createMap('map', -21.208312, 46.262851, 6);

markersLatLng.forEach(function(latLng) {
    addMarker(map, latLng);
});
Refresh the index page and voila!, 3 markers added to the map!
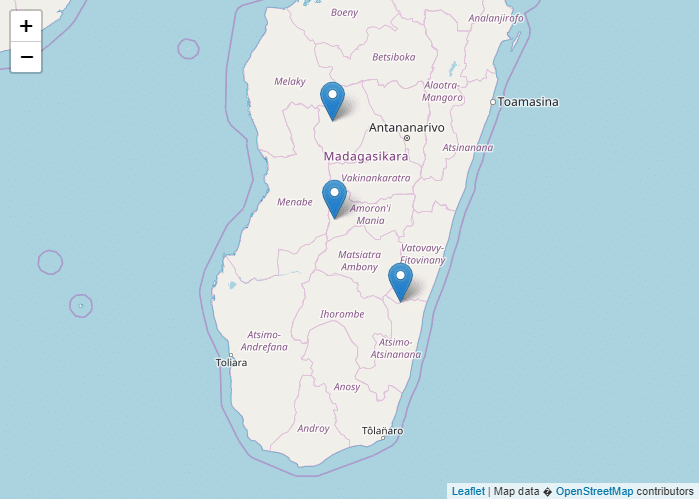
With markers
Handling click events on the map/markers
Sometimes you want to make your map more interactive, maybe show more informations when the user clicks somewhere on the map or on a certain marker.
Thanks to Leaflet, it’s very easy to do so.
Let’s say we want to show the latLng of where the user clicks, we would either use html elements or simply use the popup element that Leaflet provides.
var popup = L.popup(); // Create a popup instance
// NB: The popup should be created outside the for loop, we only need 1 popup

map.on('click', function (e) {
    // When the map is clicked, this function is executed
    // The parameter 'e' gives us informations about the click
    popup.setLatLng(e.latlng)
         .setContent("What's here: " + e.latlng.toString())
         .openOn(map);
    // We set the popup's position to where the user clicked
    // Then set its content and open it on our map
});
What if we want to show some kind of informations when the user clicks markers? Also simple.
I added a span element with the Id markerInfos where I’ll be showing the latLng where the user clicked everytime.
var markerInfos = document.getElementById("markerInfos");
var map = createMap('map', -21.208312, 46.262851, 6);

// This function simply sets the text of our span
function onMarkerClick(e) {
    markerInfos.textContent = "Marker at " + e.latlng.toString() + " clicked!";
}

markersLatLng.forEach(function(latLng) {
    addMarker(map, latLng, onMarkerClick);
    // Now we use the onClick parameter to pass our function
});
Now if you refresh the page and click somewhere on the map, the popup will appear and if you click on one of the three markers, the span’s text will change depending on the clicked marker.
Conclusion
Google Maps was used by a LOT of people, until they changed their service and made it a lot more expensive to use.
For small websites this can be fine, but for larger websites or simply websites that get a lot of hits per day, the bill can easily shock you.
This is why I went looking for an alternative and I found OpenStreetMap, the open-source and free map.
Coupled with Leaflet, It’s very easy to integrate and customize and I urge people to try it.